
Debug Mode and Developer menu
Having the ability to debugging on a device allows you, in a complete way, through ADB, to check data and analyze processes, act in case of malfunctions, develop and install apps, root and customize your device freely... as it should be for anyone purchasing a product!
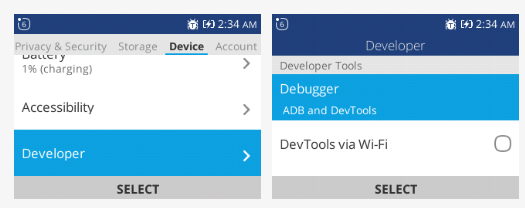
As you can see from the pictures above, the debug mode is indicated by a "bug" icon between the indicators at the top. Normally, as described by the official guides for KaiOS and Firefox OS, it should be possible to enable this property from the Settings app, by following this flow:
Device > Developer > Debugger > ADB and DevTools
Unfortunately, the reality is quite different:
The Developer menu exists in all KaiOS phones, it's an HTML file ( /elements/developer.html ) in the application.zip of the Settings app ( /system/b2g/webapps/settings.gaiamobile.org ) hidden by the manufacturer of the device.
This page will indicate all the techniques made available by our research as a third-party community.
Depending on whether your device has a Mediatek-based chipset or a Spreadtrum / Qualcomm-based chipset, the type of approach is different.
The diagram on the side (which you can also find in the "Install OmniSD" section) retraces the steps to verify the debugging on each chipset, until the device gets the Developer menu and then the Jailbreak.
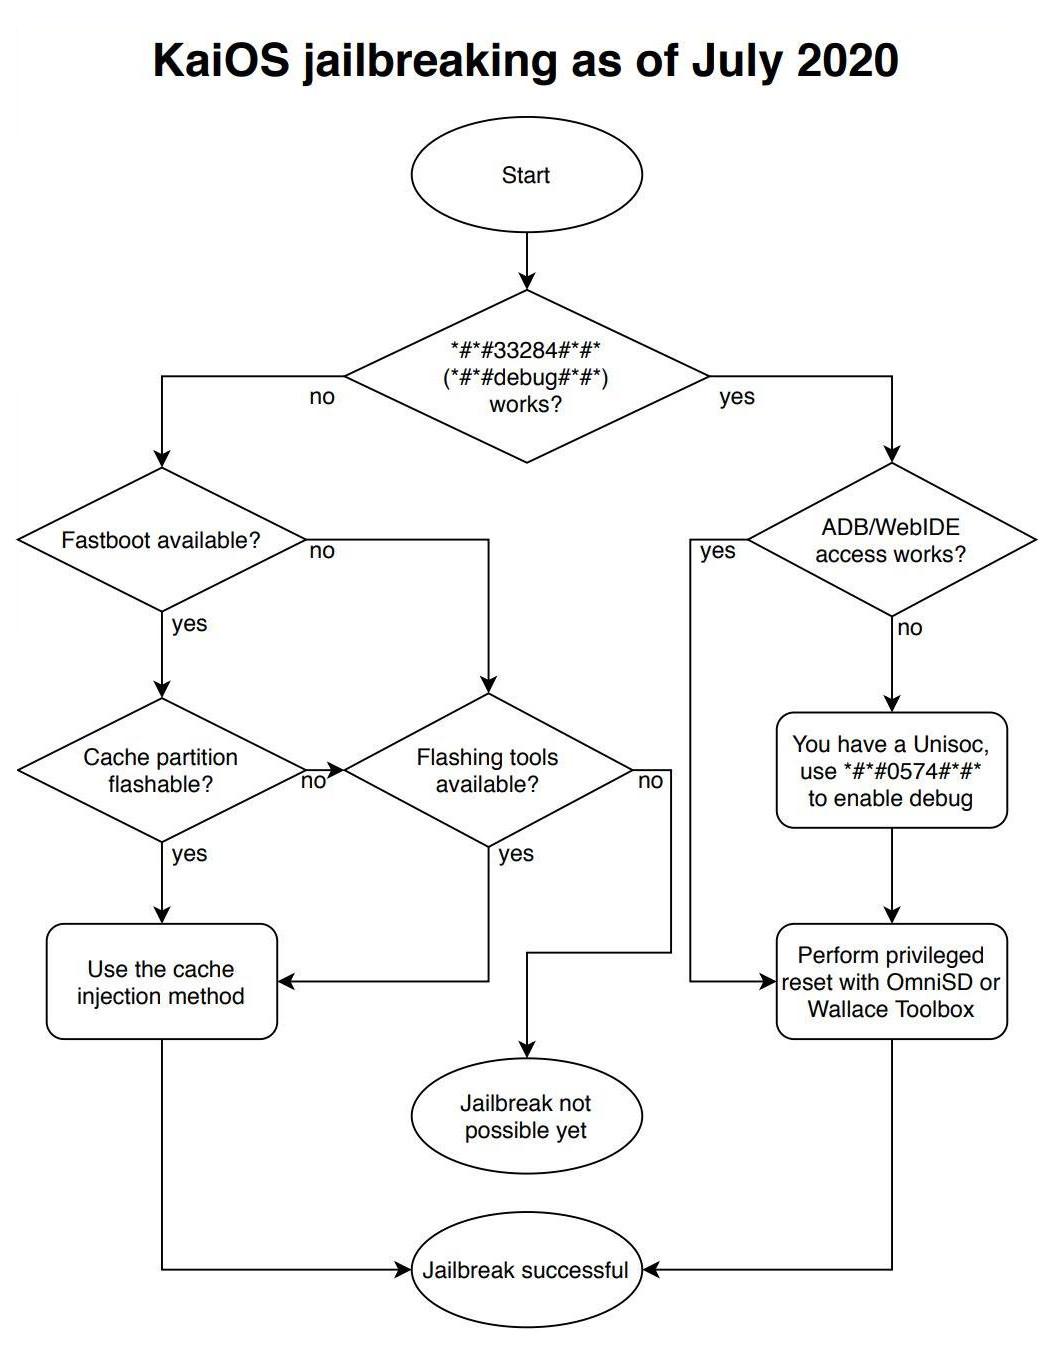
I want to start by describing the debug codes for Qualcomm and Spreadtrum phones, continue with activating the "Developer" menu via jailbreak on all KaiOS devices, and finish by delving into further tweaks for those devices that have been blocked by the manufacturer (which for the most part are unnecessary).
Debug codes (Qualcomm and Spreadtrum)
Debug-enabled devices can install applications using ADB and WebIDE directly, and they are all based on Qualcomm or Spreadtrum and can use codes absent in Mediatek-based devices, which instead can take advantage of other connections:
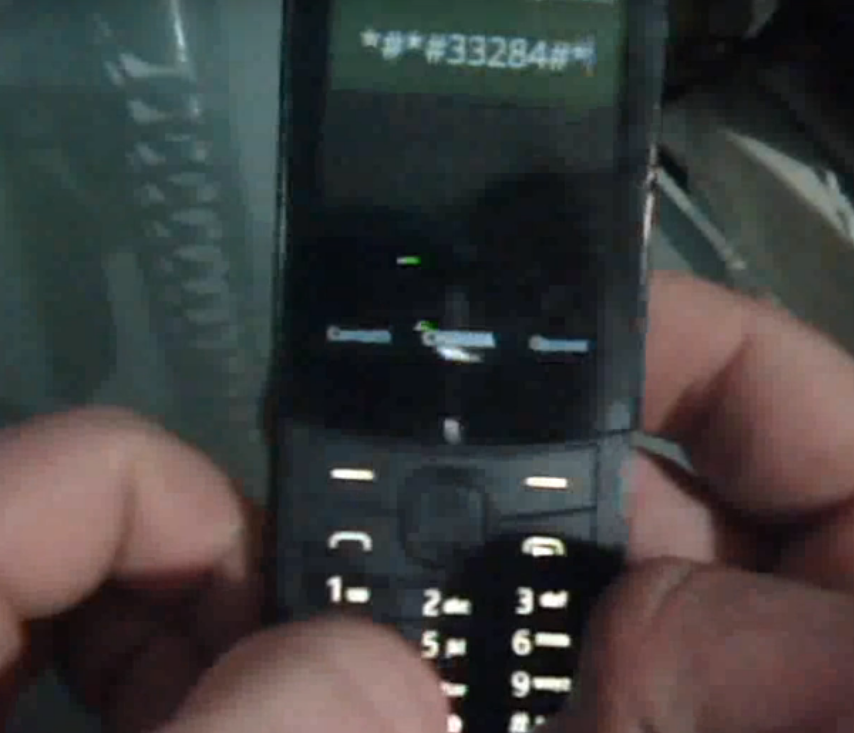
On Qualcomm-based devices, just dial the code *#*#33284#*#* , to simplify the memory suppose you write *#*#debug#*#* with your keypad. A bug icon should appear in the system taskbar above. Then we must verify if we have access to ADB and WebIDE;
On Spreadtrum-based devices. If the code *#*#33284#*#* needed for debugging works, we must verify if we have access to ADB and WebIDE. If the result is negative, enable debugging using the code *#*#0574#*#* and retry the access to ADB and WebIDE.
If access to the development tools is denied, it means that the device has the "debuggable" option disabled in the boot partition and the device is locked. So we have to use some more "extreme" changes in the firmware (see the paragraph "Devices that don't allow for adb root/remount", at the end of this page).
How to enable the Developer menu...
...using the integrated browser (W2D)
This new method was born on Discord from an idea of Luxferre and Tbrrss on September 22, 2020 and is ideal for temporarily bringing up the Developer menu, so that you can enable easily ADB and DevTools.
This is probably the easiest and most versatile way of jailbreaking most existing KaiOS-based phones. We decided to call it W2D (web-to-dev) because it's based on the hidden but totally official (as confirmed by Fabrice, KaiOS architect) fact that MozActivity class is visible from the browser context.
It just calls a hidden activity in the Settings app that opens the developer menu directly:
new MozActivity({name: "configure", data: {target: "device", section: "developer"}})
As for usage, it's very simple for most KaiOS phones:
Go to https://w2d.bananahackers.net from the phone's browser and click "Launch Developer menu". Click here to use W2D without leaving this website:
Or click here to be redirected:
Alternativelly use https://dorime.surge.sh/ and click on the "DORIME 2" button to open the Developer Menu. Click here to be redirected:
2. Enable first ADB, then "ADB & DevTools" in the Debugger menu item. Check that the bug icon appears in the panel;
3. Ensure that ADB and WebIDE connection works, connect via WebIDE or gdeploy and install Wallace Toolbox version 0.0.5 or higher or OmniSD;
4. Using Wallace Toolbox, just select # key ("Enable developer menu") and reboot the phone when prompted, or perform a privileged factory reset using OmniSD;
5. After reboot, ensure that the Developer menu is still present in the Settings > Device and you can connect to the phone in privileged mode.
NOTE that for the Doro-branded KaiOS devices, all installation can currently only be done in FFBM mode because of the way ADB server is launched there.
...using the "cache injection" method
A safe jailbreak for MediaTek-based KaiOS phones (without tampering any boot or system partitions) has been made possible thanks to the cache injection method. Unlike others, it doesn't even require factory reset and gives full privileged developer access (allowing to use, for instance, OmniSD and so on). This has also been tested on Qualcomm and Spreadtrum devices, becoming the best jailbreak method.
By clicking on each link, you will be redirected to the dedicated paragraph of the "CACHE INJECTION" guide in the "INSTALL OMNISD" section:
For all the methods listed above, the only goal is to be able to insert a file into the /cache partition, called __post_reset_cmd__ with the word "root" inside.
Learn more on the dedicated guide:
...using an app like OmniSD or Wallace
Enforce a privileged factory reset to enable all debugging facilities. Some applications like OmniSD and Wallace by Luxferre includes this function in the /js/app.js
case '#': //run the privileged factory reset if(navigator.mozPower && navigator.mozPower.factoryReset) { if(confirm('Do you really want to perform privileged factory reset? All your data will be wiped!')) navigator.mozPower.factoryReset('root') } else { alert('Error: factory reset capabilities not available') } break;you can perform this special kind of factory reset by pressing the # key (look at the video).
Learn more on the dedicated guide:
...by patching an image of the data partition
The simplest way to do this is to patch the runtime setting developer.menu.enabled in the userdata partition image. The only problem is that, unlike system partition, this setting in userdata resides in some kind of database. So, to avoid unpacking, searching, patching and repacking, we can resort to dirty direct patching of a dumped userdata partition:
Open the userdata partition dump in a hex editor like wxHexEditor;
Look for the developer.menu.enabled string in the dump;
Find the closest faultValu string fragment next to it;
Measure exactly 8 bytes from that last u letter (the target byte should be 00) and change the value of that byte from 00 to 01.
"Save as", in this way we 'll create a backup copy of our file without modify the original.
Learn more on the dedicated guide:
Devices that don't allow for adb root/remount
This problem mainly affects devices such as Alcatels sold in the United States or the various Doros, all classified on this site as LOCKED DEVICES, al with Qualcomm-based chipset. If you have ADB access but without debugging, you can check the problem in this way:
adb shell getprop ro.secure
it should return 1 as output. The things that are blocking are in the default.prop file. The ideal parameter configuration for debugging and accessing ADB is as follows:
ro.secure=0
ro.debuggable=1
persist.service.adb.enable=1
Unforuntately without mount/remount/root it's difficult to modify this file.
You basically have to repack and customize the boot partition using our guide, or flashing a new one (upon request, the manufacturer can send you an image of the boot partition, most of the time for a fee).
However, on Mediatek-based KaiOS phones you can use Fastboot to write the partition, for example by flashing a hypothetical custom boot.img file using the command:
fastboot flash boot boot.img
obviously following the appropriate guide (ADB & Fastboot ) and knowing how to start the phone in Fastboot mode (look for ca.in. on the CACHE INJECTION page). The problem is being able to have a copy of that partition.