
SWAPFILE: how to double the RAM memory and speed up your phone
by Speeduploop
(extreme/unsafe method that blocks updates)
Before making extreme changes, take the following precautions:
1. Create a backup of the system partition and save it on the SD card, as root:
dd if=/dev/block/bootdevice/by-name/system of=/sdcard/system.img bs=2048
2. Place the RestoreSystem_signed.zip file on the sd card, next to system.img
adb push RestoreSystem_signed.zip /sdcard/
3. Permanently replace the recovery mode with a custom one (read the guide).
4. Now you can safely customize the system. To receive official updates you will need to restore everything by running the RestoreSystem_signed.zip file from Recovery. Once the process is complete, a system script will reinstall the stock version of the recovery on first boot.
Repeat this procedure every time you decide to start customizing only the system partition.
This process will allow you to increase the performance of your device by creating a swap file that will act as an extension of the physical RAM to double it.
1) Copy and paste this into a file you must call "init" on your home folder:
#!/system/bin/sh
#################################################################
# uncomment the following 2 lines to enable existing swapfile...
#################################################################
swapon /data/opt/swapfile
swapoff /dev/block/zram0
#################################################################
busybox telnetd -l /system/bin/sh -b 127.0.0.1
2) Get a temporary root access. Remember, the following commands are written if you use Telnetd app, but you can get root in a easier way using Wallace and ADBRoot. Using them you don't need to write "busybox" or "busybox telnet localhost" and just write "exit" one time:
3) Create the swapfile and push the file init into a new folder:
adb shell
busybox telnet localhost
mount -o remount,rw /system
mount -o remount,rw /data
busybox mkdir /data/opt
busybox dd if=/dev/zero of=/data/opt/swapfile bs=1024 count=524288
busybox mkswap /data/opt/swapfile
exit
exit
adb push init /data/opt/init
adb shell chmod +x /data/opt/init
4) We finally created the swapfile and placed init inside the partition /data. But now we need to activate it. The system must recognize the presence of the SWAP and to do this we must interact with the /system/etc/init.qcom.post_boot.sh file.
NOTE: This will interrupt system updates, so make a backup of the "system" partition so that you can restore everything in the future, when necessary.
adb shell
busybox telnet localhost
mount -o remount,rw /system
echo '/data/opt/init & ###bootstrap###' >> /system/etc/init.qcom.post_boot.sh
sync
mount -o remount,ro /system
reboot
5) After the reboot you have 1GB in total (512 RAM + 512 swap) and more space for caching!
To verify that everything works correctly, run from the terminal:
adb shell b2g-info
Check that the "SwapTotal" item corresponds to the value 512.0 MB:
in the image the green shell has a "SwapTotal = 256.0 MB" value, in this case the procedure must be repeated, surelly some steps have been skipped, the swapfile doesn't work.
The RED shell is the correct one!
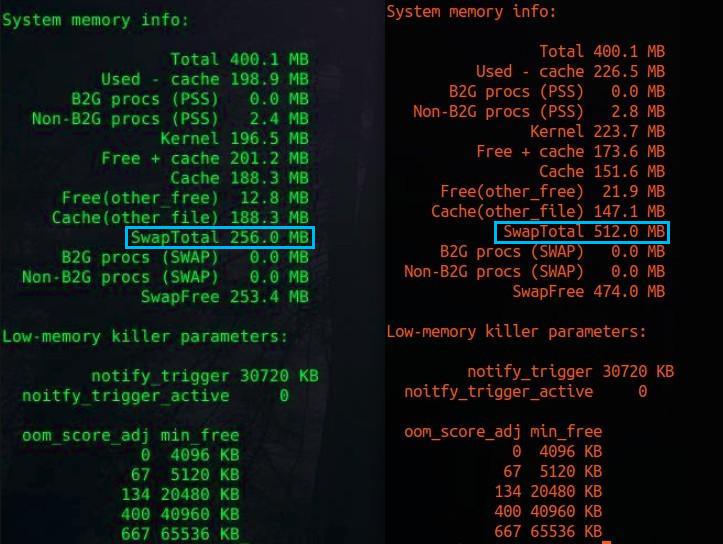
SwapTotal is the value in MB of the swapfile size. Commands for using a swapfile instead of zram exists but aren't enabled.
Why swapfile? Zram is swap as a compressed ramdisk - fast but it's reserving about half of the physical RAM (practically while using your device convinced to have 512 MB of RAM available in reality you are using only 256, or even less considering the system processes).
If you use a swapfile instead of zram you have more physical RAM for caches and usable RAM is also bigger (apps aren't killed for low-memory as often as without swap).
powered by speeduploop