
REPAIR EVERYTHING FROM RECOVERY MODE
An error that often occurs when you don't have a "pure" KaiOS device with clean and untouched partitions is the OTA update that returns an error in the form of a log.
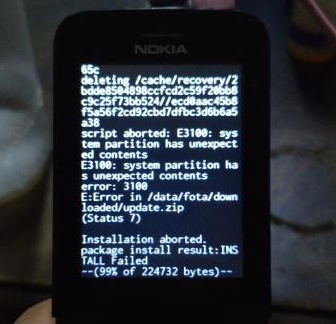
Most of the time the error concerns a faulty partition like this in the picture. This is because the update package detects the integrity of the system, and often the error corresponds to a detection that does not meet expectations.
As it's written on the internal licenses:
"THIS SOFTWARE IS PROVIDED AS IS".
Modifying the system to your liking interrupts the warranty, therefore the update interrupts its action in order not to further compromise the stability of the system and damages that may require user compensation.
This is why it's so important to keep a copy of your clean partitions, and since there are some "backup partitions" in the structure (which generally contain the word "bak" in the name) it becomes even more difficult to make the device comply with the integrity standards dictated by the OTA update.
For example, if the damaged partition is /aboot and we replace it, there may be a difference on the checksum when we try to update again, because in the meantime the /abootbak will replace again /aboot with its own regenerated copy, just as it does /system with /recovery.
NOTE: using these commands we must be careful to distinguish the directory structure in a KaiOS system installed on one chipset compared to another chipset:
Qualcomm and Mediatek are quite similar, their structure should be always "/dev/block/bootdevice/by-name";
Spreadtrum-based models have are structured like this, "/dev/block/platform/soc/by-name".
Our clean dumps, combined with the tools that massively restore the partitions, are enhanced by our ability to read the logs, which are stored in the cache.
How to read the logs stored on the cache
You can read the logs in three ways:
1) From adb shell, as root, we can read the logs list with the following command:
ls /cache/recovery
Usually the errors are listed in the last_log file, you can read it in this way, ar root:
more /cache/recovery/last_log
2) From Recovery Mode select "view recovery logs";
3) Copy the cache partition with this command, as root:
On Qualcomm-based phones
dd if=/dev/block/bootdevice/by-name/cache of=/sdcard/cache.img bs=2048
On Spreadtrum-based phones
dd if=/dev/block/platform/soc/by-name/cache of=/sdcard/cache.img bs=2048
How to replace the Recovery
The use of a Custom Recovery is important to speed up the backup and restore operations, wherever and whenever you want, so before you read about our tools you must know:
how to get a copy of the recovery;
how to made a custom recovery for your device (because they can be different);
how to replace it temporarily;
above all you need to know why it is necessary to replace it only temporarily!
NOTE: the use of a Recovery with ADB root is recommended!
Learn more on the dedicated guide:
Restore using "dd" from a custom Recovery
NOTE: in case you want to replace "recovery" you can do it from the normal startup, but in case you want to replace "system" do it from a custom recovery. Remember this rule!
Every other partition flashing is indifferent, but the important thing is to have the possibility to access at least one working mode, from where we can perform operations with root privileges.
In the example of the first photo we have taken as an reference point an error related to the system partition. To flash a system partition with a system.img file, from Recovey Mode run the following command:
On Qualcomm-based phones
dd if=/sdcard/system.img of=/dev/block/bootdevice/by-name/system
On Spreadtrum-based phones
dd if=/sdcard/system.img of=/dev/block/platform/soc/by-name/system
If the partition to be replaced is "boot" and our file is boot.img, the command will be:
On Qualcomm-based phones
dd if=/sdcard/boot.img of=/dev/block/bootdevice/by-name/boot
On Spreadtrum-based phones
dd if=/sdcard/boot.img of=/dev/block/platform/soc/by-name/boot
The same will be for other kinds of partitions.
4bash.zip to restore everything in bulk
by PuriShnit
Having a Custom Recovery available that includes the test-keys necessary to flash the zip archives, we can count on some scripts. First of all the PuriShnit's tool.
4bash.zip is an archive ready to be installed by Recovery Mode, and follows the indications that are listed on an easily costumizable external file, which is called "bash4zip.sh";
bash4zip.sh is a text file in which a script to be executed must be compiled, so you can also create one yourself, without downloading the example, but 4bash.zip recognizes only the presence of a file on the /sdcard path that has only this name.
These two files work together. If you try to start 4bash.zip without the presence of the above script in /sdcard, the installation will stop with an error message.
This very useful tool allows you to customize a multiple flashing scheme of partitions on your device, using the commands mentioned in the main page of this section:
Download 4bash.zip and bash4zip.sh by PuriShnit
Compile the bash4zip.sh script with the correct name of the dump.
In this example I've named it named FILENAME and the right path (PARTITION).
On Qualcomm-based phones
/tmp/busybox dd if=/sdcard/FILENAME of=/dev/block/bootdevice/by-name/PARTITION
On Spreadtrum-based phones
/tmp/busybox dd if=/sdcard/FILENAME of=/dev/block/platform/soc/by-name/PARTITION
For example, if we have our dumps (after used dumpall.zip) in /sdcard/dumps and we want to restore /system and /userdata we have to compile the script in this way, on Qualcomm:
/tmp/busybox dd if=/sdcard/dumps/system.img of=/dev/block/bootdevice/by-name/system
/tmp/busybox dd if=/sdcard/dumps/userdata.img of=/dev/block/bootdevice/by-name/userdata
3. From the custom recovery just select:
"Apply update from SD card > 4bash.zip"
NOTE: in case of errors just select "Mount /system" before flashing the zip. The waiting time depends on the size of the files you want to install, of course.
This package can be used not only to flash partitions, but to do anything you want on your device simultaneously. Just compile the bash4zip.sh script at your convenience, according to your needs.
Example: a kit for 8110 users
Download and extract RESTORE-8110.7z on your sd card, inside you will find the following elements:
4bash.zip, which you will be flashed from recovery;
bash4zip.sh, which I have already compiled for you on a v12 firmware;
"new-dumps", that is an empty folder in which you will have to insert your clean dumps.
Below I attach how to place them exactly on the SD card, along with the .7z file to be unpacked:


NOTE, I have urgent recommendations to make before you use this tool, especially if you are less experienced:
Use clean dumps for your firmware version only (13 with 13, 12 with 12 and so on),
don't change bash4zip.sh if you don't know exactly what you're doing
make sure that the listed partitions are present in the "new-dumps" folder.
I have compressed everything into a 7z archive to avoid having it run by Recovery Mode, because I know that many of you don't read the instructions ;)
Clean dumps and custom Recovery for Nokia 8110 4G are available on this page:
A script only for the system partition
by Vivek
If you have modified only the system partition, most likely it will be the only one to be replaced. This can happen because the deeper changes that we make to our device generally affect only this ROM (removing internal files, add an ADblock, removing the integrity check for the Recovery, change the color of the stock application icons, an extreme jailbreak using omnijb-final.zip, integrate extra functions all inside the system...).
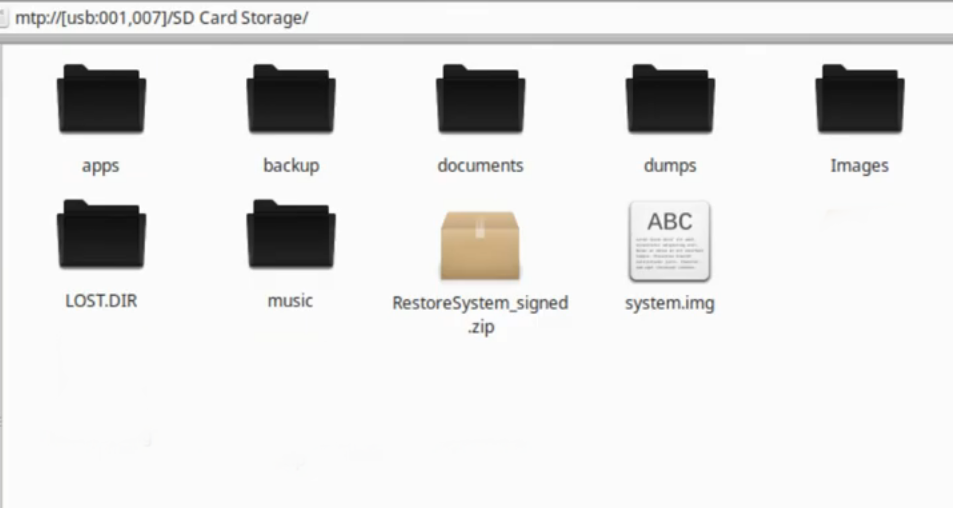
Custom ROMs in most cases concern changes made only to the system partition (there are also cases where multiple partitions are modified, but refer to 4bash.zip for this topic). To correct this error using a custom Recovery, just place our system partition clean dump on the sd card together with this powerful tool, RestoreSistem_signed.zip
The installation takes place, as always, by selecting from Recovery:
"Apply update from SD card > RestoreSystem_signed.zip"
Here's how system.img and RestoreSystem_signed.zip must be placed on the sd card:
In this way we will be ready every time to restore the system ROM in the stock version in case we are notified of the presence of a new update (maybe if we are not at home).